


Paint decontamination is the four-step process — wash, iron remover, tar remover, clay bar — that strips bonded contamination out of your clear coat before a ceramic coating, sealant, or wax goes down. Skip it and your coating bonds to the contamination instead of the paint, which means shorter durability, less gloss, and visible bumps you can feel through the finish. A clean-looking freshly washed car isn't actually clean at the microscopic level. Every panel is carrying embedded brake dust, industrial fallout, road tar, and rail dust that a normal soap wash can't remove. Here's the exact 4-step decon workflow the pros use, the science behind why each step matters, and how to do it in a driveway on a weekend.

Why Paint Decontamination Actually Matters
Run your hand over a freshly washed hood with a plastic sandwich bag between your fingers and the paint. If you feel any grit, bumps, or roughness — that's bonded contamination the wash didn't remove. According to the International Carwash Association, three types of contamination embed into automotive clear coat over time: ferrous (iron/brake dust), petroleum-based (road tar, asphalt, rail residue), and mineral (hard water spots, tree sap crystallization).
Each type has a specific chemistry, and each needs a specific removal method. A soap wash removes only the loose surface layer. Everything bonded stays until you dedicate a step to removing it.
What happens if you skip decon before a ceramic coating:
- The coating bonds to the contamination — not to the clear coat
- Contamination continues to corrode the paint underneath the coating
- You get visible pin-prick bumps you can feel through the finish
- Coating durability drops significantly — sometimes by half
- Gloss suffers because the paint surface is uneven under the coating
This is the single biggest reason DIY ceramic jobs underperform pro installs. The chemistry is the same. The prep isn't.
What You Need Before You Start
- Two buckets with grit-trap inserts (wash bucket + rinse bucket)
- A pH-neutral Undrdog Soap — no wax additives
- A plush microfiber wash mitt
- A foam cannon or foam gun (helpful but not required)
- The Purps iron and fallout remover for step 2
- A dedicated tar remover for step 3
- A soft to medium grade clay bar or clay mitt for step 4
- Clay lubricant OR extra Undrdog Soap solution as lubricant
- 6–8 fresh plush microfiber drying and wipe-down towels
- Wax and grease remover or denatured alcohol for the final wipe if coating is next
- Nitrile gloves
- Bright lighting or shaded work area — direct sun is your enemy here
Step 1: A Proper Two-Bucket Wash
Why This Step Matters
Every decon step after this works better on a clean starting surface. Dust and grit left on the paint drag when you clay bar and introduce fresh scratches. A proper wash also cools the panels — chemical decon reacts more predictably on cool paint than hot paint.
The Two-Bucket Method
Fill one bucket with pH-neutral soap and warm water. Fill the second bucket with plain rinse water. Both get grit-trap inserts at the bottom. Foam pre-soak if you have a cannon. Then wash panel by panel — dip the mitt in the soap bucket, wash a section, rinse the mitt in the rinse bucket (never back in the soap bucket), soap again, next section. Top-down, dirtiest panels last.
Full step-by-step technique lives in our two-bucket wash guide.
Rinse the entire car thoroughly and dry with a plush microfiber. Do not use waxy quick-detail sprays at this stage — you want zero coating residue for the following steps to bite into.
Step 2: Iron Decontamination With The Purps
What Iron Contamination Is
Every time a car brakes, hot iron particles fly off the rotors and drift onto surrounding vehicles. Highway commutes bake industrial fallout into your paint from steel plants, trains, and construction. Those ferrous particles bond into the clear coat and start to corrode outward — which is why abandoned white cars turn orange-brown over years.
You can't wash iron out. Water doesn't dissolve iron. You need chemistry.
How Iron Removers Work
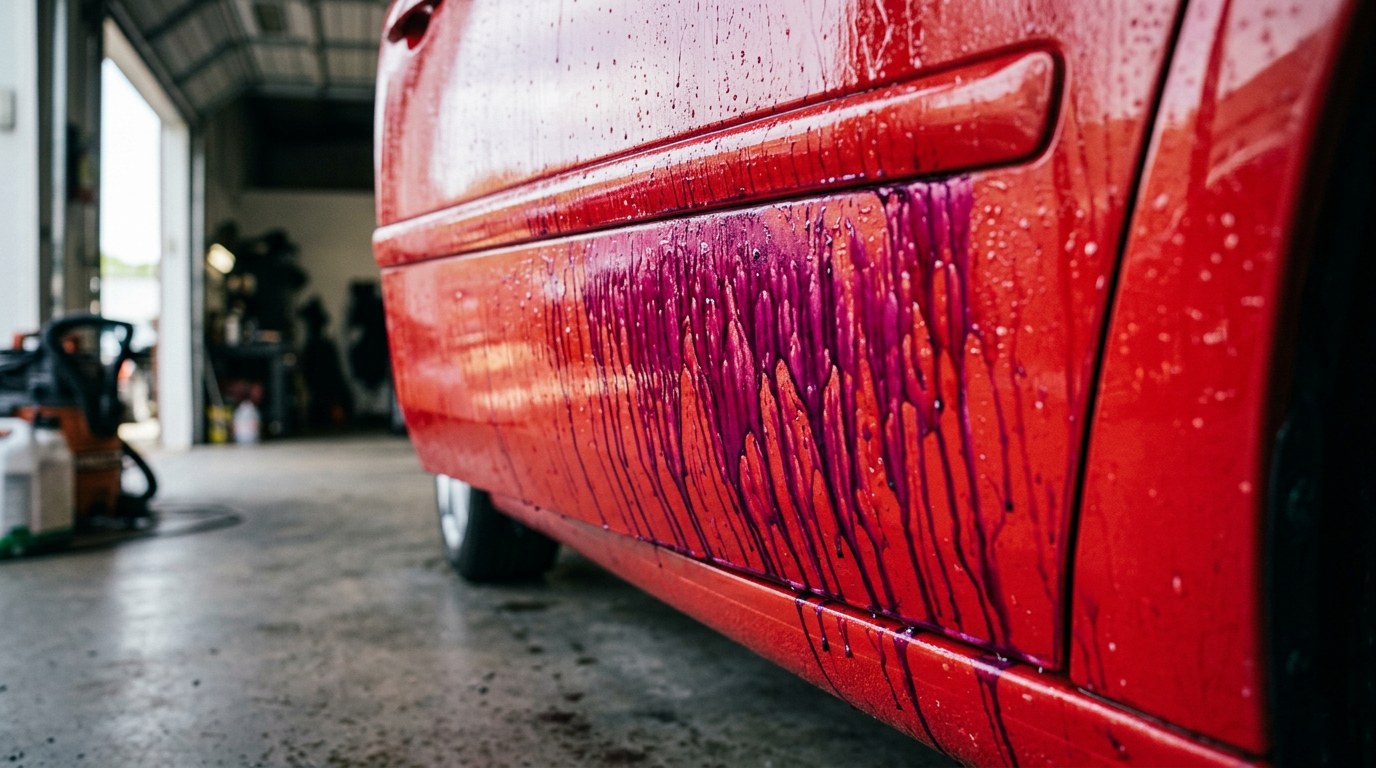
Iron remover sprays contain a sulfur-based compound — typically thioglycolic acid or a similar chelator. When it contacts ferrous metal, it triggers a color-change reaction that turns purple to red-purple. The purple you see bleeding down the panel isn't paint damage. It's the chemical dissolving embedded iron particles.
Applying The Purps
- Work on a cool, wet, and shaded panel
- Spray The Purps evenly across the panel — full coverage, no dry spots
- Let it dwell 3–5 minutes — watch the purple bleeding develop
- Do NOT let it dry on the paint
- Rinse thoroughly with a strong hose stream or pressure washer
- Heavily contaminated cars may need a second pass on the lower panels
Lower rockers, wheel wells, and the bottom third of doors always show the heaviest purple reaction. The roof and upper panels usually show the least. That map tells you where your paint is taking the most abuse.
The Purps also works on wheels — spray, dwell, agitate with a soft brush, rinse. Brake dust dissolves off in the same reaction.
Step 3: Tar and Adhesive Removal
Why Tar Is a Different Problem
Tar spots — small hard black dots on lower panels — are petroleum-based, not ferrous. Iron remover won't touch them. Tar is asphalt binder that flies off hot summer roads and sticks to your paint. The Federal Highway Administration pavement bulletin notes that asphalt binder softens at surface temperatures above 120°F, which is exactly what happens to a summer highway in most of the country.
Removing Tar Properly
Use a dedicated automotive tar remover — solvent-based citrus or petroleum distillate formulas work well. Apply to a soft microfiber towel, not directly to the paint. Press the towel against the tar spot for 15–30 seconds to soften the tar, then wipe. Work in small sections and rotate to a fresh area of the towel frequently.
For deeper technique on this specific step, our road tar removal guide walks through the specific dwell times and safety notes.
Wipe the residue with a damp microfiber to remove any solvent film. Rinse the panel one more time before moving to step 4.
Step 4: Clay Bar or Clay Mitt Decontamination
What Clay Actually Does
Even after chemical decon in steps 2 and 3, there's physical contamination — micro-particles too small to feel individually but visible under magnification — still bonded to the clear coat. Clay physically pulls those particles out.

A clay bar is a soft synthetic polymer designed to grab contamination without abrading paint — as long as it stays lubricated. Clay mitts are a faster synthetic alternative that use rubber polymer pads instead of clay.
How to Clay Bar Correctly
- Knead the clay into a flat pad slightly larger than your palm
- Lubricate the panel generously — a dedicated clay lubricant OR a soapy solution of Undrdog Soap and water in a spray bottle
- Glide the clay in straight-line passes — do not use circular motions
- You'll feel resistance the first pass. When resistance disappears, that section is clean
- Fold the clay to expose a fresh face when the working surface darkens with contamination
- If you drop the clay on the ground — throw it away. Grit embedded in dropped clay will scratch paint
- Work top-down, one panel at a time
Grade Selection
Soft-grade clay for daily drivers and coated cars. Medium-grade clay for neglected paint with heavy contamination. Heavy-grade only for extreme cases — it can mar clear coat and you'll need to polish afterward.
Common Mistakes
- Not enough lubricant — this is the #1 cause of clay-related marring
- Using circular passes instead of straight lines
- Reusing dropped clay
- Working in direct sun where lubricant evaporates fast
- Using heavy-grade clay on paint that doesn't need it
The Final Wipe Down Before Coating
If a ceramic coating is next, do one final wipe with wax and grease remover or denatured alcohol on fresh microfiber. This strips any remaining lubricant residue, clay dust, or oils that would block the coating from bonding. Wipe each panel with a fresh section of towel. Do not reuse towels across panels.

The paint should feel like glass — no drag, no bumps, no grit. That's when the surface is coating-ready. See our streak-free ceramic coating application guide for the next steps. Then apply your ceramic — HCC for the flagship all-surface option, Undrdog Pro for a paint-focused DIY-friendly job, or Pro Plus for the pro-tier elite finish.
Decontamination Method Comparison
| Contamination Type | Removal Method | Signs You Need It | Frequency |
|---|---|---|---|
| Loose dirt and grime | Two-bucket soap wash | Visible on paint after driving | Weekly to biweekly |
| Iron / brake dust / rail fallout | Iron remover (The Purps) | Orange freckle spots on white paint, roughness on lower panels | 2–4× per year |
| Road tar / asphalt | Dedicated tar remover | Small hard black dots on lower panels | As needed, more in summer |
| Bonded physical particles | Clay bar or clay mitt | Grit felt through a plastic bag test | 1–2× per year, always before coating |
| Water spots / mineral deposits | Water spot remover | White etched rings or spots | As needed |
| Wax / sealant residue | Wax and grease remover | Prep before coating | Once, immediately before coating |
Full Decon Timing and Environment
- Plan 3–4 hours for a full decon on a sedan — longer for a truck or heavily contaminated vehicle
- Work in shade with panels cool to the touch — direct sun evaporates chemical decon before it can react and dries clay lubricant instantly
- Ambient temp 50–85°F is ideal — colder slows the iron remover reaction, hotter creates drying risk
- Have a garden hose or pressure washer ready — chemical decon must be rinsed, not dried
- Do the whole car in one session — you don't want decontamination sitting on paint overnight, and half-decon sets you up for missed spots
How Often to Fully Decontaminate
Full 4-step decon: once a year for a garaged daily driver, twice a year for a car parked outside near industry or highways, immediately before any ceramic coating application, and any time the plastic bag test reveals bonded roughness. For maintenance between full decons, iron remover a few times a year on wheels and lower rockers is enough to keep buildup manageable.
Ceramic-coated cars still need periodic decon. The coating slows contamination bonding but doesn't prevent it. Iron and tar can still land on top of a coated surface — they just wash off easier. Full decon every 12–18 months on a coated car keeps the coating clean and preserves gloss.
Ready to decontaminate the right way?
The Purps is a color-changing iron and fallout remover that dissolves brake dust and industrial contamination on contact — the exact chemistry pros use before a ceramic coating job.
Shop The Purps →Frequently Asked Questions
What is paint decontamination?
Paint decontamination is the four-step process of removing bonded contamination — iron/brake dust, road tar, and physical particles — that a normal soap wash can't remove. The steps are wash, iron remover, tar remover, and clay bar. It's the mandatory prep before any ceramic coating, wax, or sealant.
Do I really need to decontaminate before a ceramic coating?
Yes. A ceramic coating bonds to whatever is on the surface at the moment of application. If contamination is there, the coating bonds to contamination — not to your clear coat. That drops coating durability, reduces gloss, and creates visible bumps you can feel through the finish. Skipping decon is the single biggest reason DIY ceramic jobs underperform pro installs.
How do I know if my paint needs decontamination?
Do the plastic bag test. After washing and drying, put a plastic sandwich bag over your fingertips and lightly run them across a horizontal panel. If you feel grit, bumps, or roughness — you have bonded contamination. Smooth paint feels like glass through the bag.
What does the purple color from iron remover mean?
The purple bleeding is a chemical reaction between the iron remover's sulfur-based chelator and ferrous metal particles embedded in your paint. It's a color-change indicator — the darker and more widespread the purple, the more iron contamination is bonded to that panel. It's not paint damage.
Can I use iron remover on wheels?
Yes — iron remover works exceptionally well on wheels. Spray, dwell 3–5 minutes, agitate with a soft wheel brush, then rinse thoroughly. Brake dust is primarily iron, so wheels typically show the most dramatic purple reaction on the whole car.
Is a clay mitt better than a clay bar?
A clay mitt is faster and doesn't need re-kneading, and it can't be ruined by dropping it. A clay bar can conform to tight contours and edges more precisely. Both work — mitt for speed on flat panels, bar for detailed work around emblems and trim. Either way, keep the surface heavily lubricated.
How often should I fully decontaminate my car?
Once a year for a garaged daily driver, twice a year for a car parked outside near industry or highways, and always immediately before any ceramic coating. Interim iron remover treatments on wheels and lower rockers a few times a year keep contamination manageable between full decon sessions.
Can I decontaminate a ceramic-coated car?
Yes, and you should — every 12–18 months. Iron remover and clay bar are both safe on coated paint when used correctly. Chemical decon strips contamination that landed on top of the coating without harming the coating itself. Avoid harsh abrasive polishes, which will remove the coating.
What temperature is best for decontamination?
50–85°F ambient temperature, panels cool to the touch, in shade. Direct sun evaporates chemical decon before it can react and dries clay lubricant instantly. Colder temperatures slow the iron remover reaction and reduce effectiveness.
Do I need clay if I already used iron remover and tar remover?
Yes. Iron remover handles ferrous contamination. Tar remover handles petroleum-based contamination. Clay removes the physical particles that are neither ferrous nor petroleum — micro-particles from brake dust, environmental debris, and paint overspray that neither chemical dissolves. All three steps address different contamination types.

Leave a comment
This site is protected by hCaptcha and the hCaptcha Privacy Policy and Terms of Service apply.