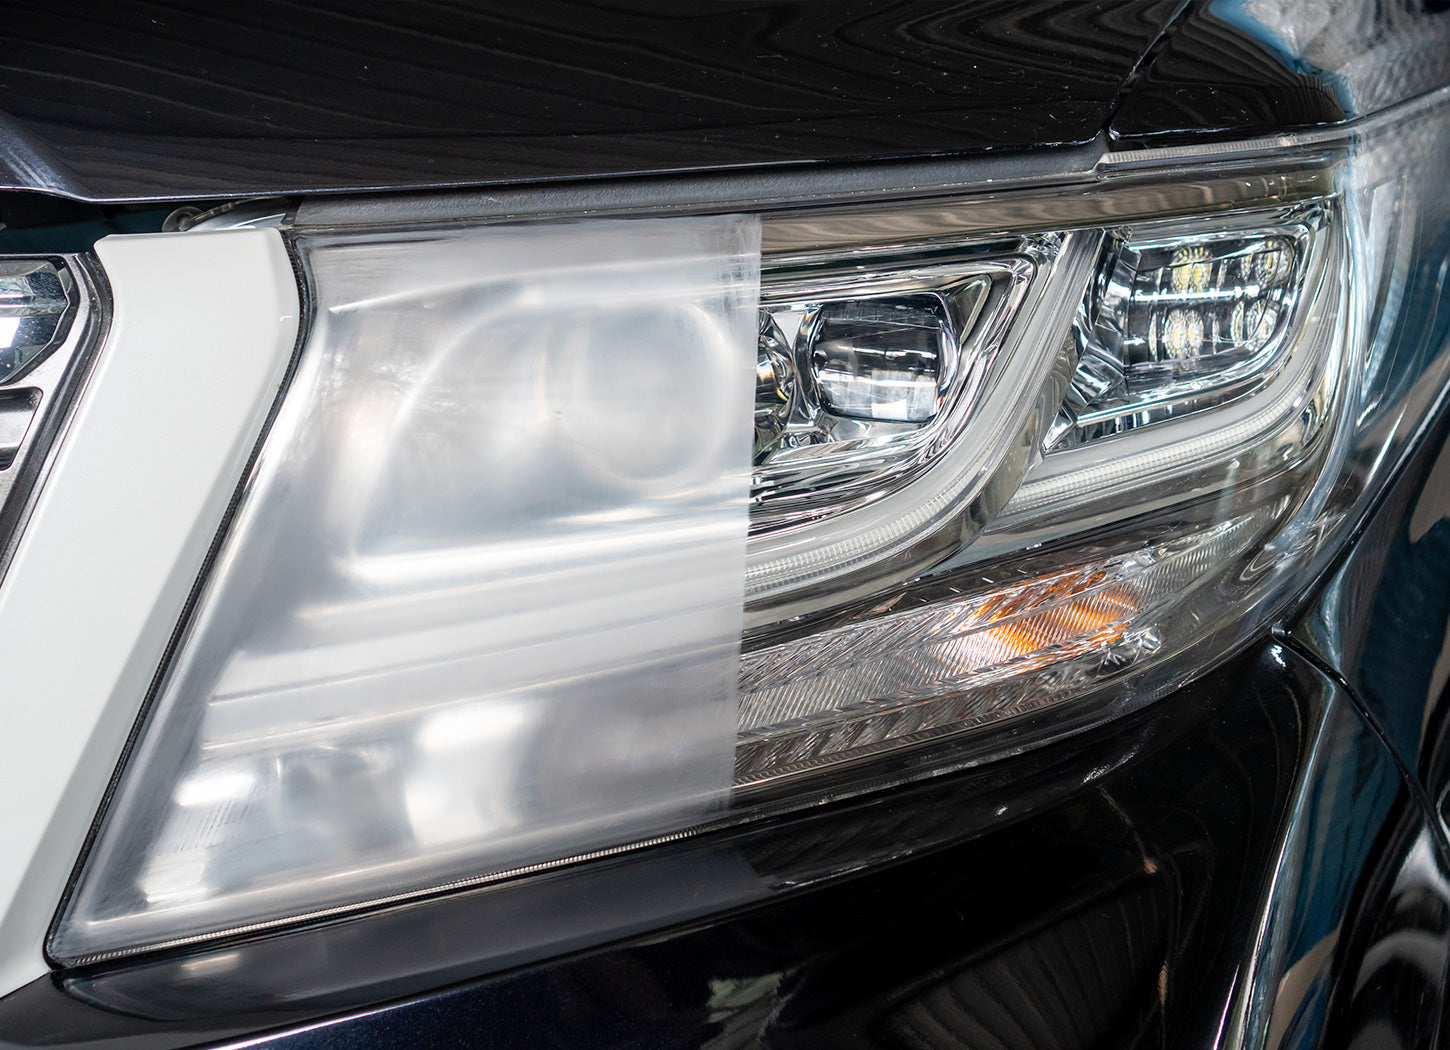
Ever glanced at your car and noticed your headlights aren't as crystal clear as they once were, but instead, they're clouded with a yellowish hue? This isn't just an aesthetic issue; it's a safety concern. The culprit? Oxidation, primarily from the sun's relentless UV rays. These two work in pair to gradually deteriorate the plastic surface and makes it look cloudy.
Not only is it ugly on the front of your car, but it can also be dangerous as this cloudiness impedes visibility for you and for others on the road. It will also reduce the amount of light illuminating the road by up to 75%.
Imagine driving down a dark road with poor visibility, and you hit Smoky the Bear all because your headlights are cloudy, making visibility poor! In this article, we will delve into why it is important to have clear/clean headlights and how to do it properly.
Why is headlight restoration important?
First and foremost, restoration lengthens your line of sight. This makes driving at night and in bad weather safer due to a longer reaction time. It will also save you money long-term down the road.
Headlight restoration is a relatively cost-effective service versus complete replacement. The cost to have your headlights professionally restored is usually between $100-$200 on average, whereas replacing your headlights can cost upwards of $500 or more.
Another benefit is that it keeps your car looking sharp! Who wants to have a slick car, badass paint, and cloudy headlights? Get your headlights restored people! You can either do it yourself if your headlights aren’t too bad or have it professionally done.
How To Do It Yourself And Do It Right

Restoring your headlights yourself is definitely the least expensive way to go. There are tons of DIY kits online that require no tools and will include an oxidation remover, sanding pads, and a protective coating to put on once the headlights are cleaned.
First, you want to take your 400-600 grit sandpaper and get it wet along with wetting your headlight. The water acts as a lubricant so that you don’t get deep scratches.
Using a soft, circular motion, sand the entire headlight while not forgetting to keep it wet and remember not to press too hard on the sandpaper. After finishing the first sanding, spray the headlight with water then wipe off with a microfiber towel.
Using a soft, circular motion, sand the entire headlight while not forgetting to keep it wet and remember not to press too hard on the sandpaper. After finishing the first sanding, spray the headlight with water then wipe off with a microfiber towel.
Then, you will take your 2000-3000 grit sandpaper and use the same technique except rubbing horizontally instead of in a circular motion. Once done with all the sanding, you will rinse and dry off again, then follow that with wiping the surface of the headlight down with denatured or isopropyl alcohol to remove any last oils or residues.
Now you are ready for the last and final step in restoring your headlights: Protective Coating.
Applying Protective Coating To Your Headlights In a Nutshell
A protective coating over your headlights will slow down or even stop future oxidation caused by UV rays, road debris, etc. We suggest using our Undrdog Pro coating to obtain these awesome results.
The application is simple and easy. First, apply 10-20 drops of Undrdog Pro to your applicator pad and thoroughly cover the entire surface. Next, we wait. We wait 7-10 minutes to let the product “flash”, or become tacky.
We then use a 3 towel method for buffing out the protective coating. The first towel is used for the initial wipe-off of the coating. The second towel is used to get anything left behind from the first wipe.
Lastly, the third towel is just for the final wipe to make extra sure that you buffed everything out. And, VOILA! You’re done and protected for years to come!
Finding A Reputable Detailer To Do It For You

Now, if this is too much work for you or you don’t have enough time to do a stellar job, then we suggest finding a local, reputable detailer in your area. They will be able to provide this service and many others to bring your ride back to its former glory.
Besides, having your ride looking great makes YOU feel better and more confident!
Choosing the Right Restoration Method for Your Vehicle
Different cars and headlights might require varied restoration techniques. While DIY headlight restoration kits work wonders for minor haziness, severe discoloration or damage might need professional intervention.
For those looking to understand how to clean headlights or how to restore headlights, it's essential to consider factors like the age of your vehicle, the extent of the damage, and the type of headlights.
Older cars with classic glass headlights might need a different approach than modern ones, which might benefit more from a headlight cleaning kit.
When is the Right Time for Headlight Restoration?
Recognizing the early signs of foggy headlights is crucial:
- Yellowing: Indicates UV damage and is a sign you need to start cleaning foggy headlights.
- Minor Scratches: Often caused by road debris. A headlight restoration might be in order.
- Fogginess: Indicates trapped moisture or early stages of oxidation. This is when you should consider how to clean the headlight lens.
- Dimming Lights: If your headlights aren't as bright as they once were, it might be time for a headlight replacement or at least a thorough cleaning.
Regular inspections can help in timely restorations. For those who prefer DIY, understanding how to clean car headlights using home remedies like toothpaste can be beneficial. However, for the best results, a headlight restoration kit is recommended.
FAQs on Headlight Restoration
This short FAQ section will tell you everything you’ll ever need to know about cleaning and restoring headlights.
What causes headlights to become cloudy?
Oxidation from UV rays, atmospheric pollutants, and micro-abrasions from road debris. Regular cleaning of headlights can prevent this.
How often should I restore my headlights?
Depending on your driving conditions and the quality of the headlight cleaner used, restoration might be needed every 1-3 years.
Can I use toothpaste to clean my headlights?
Yes, toothpaste can be a quick DIY headlight restoration method for minor discoloration. However, for severe damage, a headlight cleaning kit might be more effective.
Is professional restoration better than DIY?
Both methods have their merits. While DIY headlight restoration is cost-effective, professional services offer expertise, especially if you're looking at headlight replacement or headlight tint services.
How long does the restoration process take?
A DIY restoration, especially if you're just cleaning a headlight lens, can take anywhere from 30 minutes to a couple of hours. Professional services might take longer.
Wrap up
There are many benefits to headlight restoration ranging from aesthetics to monetary value, but your and your passengers’ safety trumps everything else. Remember, we don’t want to take out Smoky or anyone else for that matter because of poor visibility that could have been avoided.
With the right knowledge and tools, ensuring your headlights are in top condition becomes a straightforward task. Whether you're opting for a DIY headlight restoration or seeking professional help, the key is regular maintenance and timely intervention. Safe driving!

Leave a comment
This site is protected by hCaptcha and the hCaptcha Privacy Policy and Terms of Service apply.