


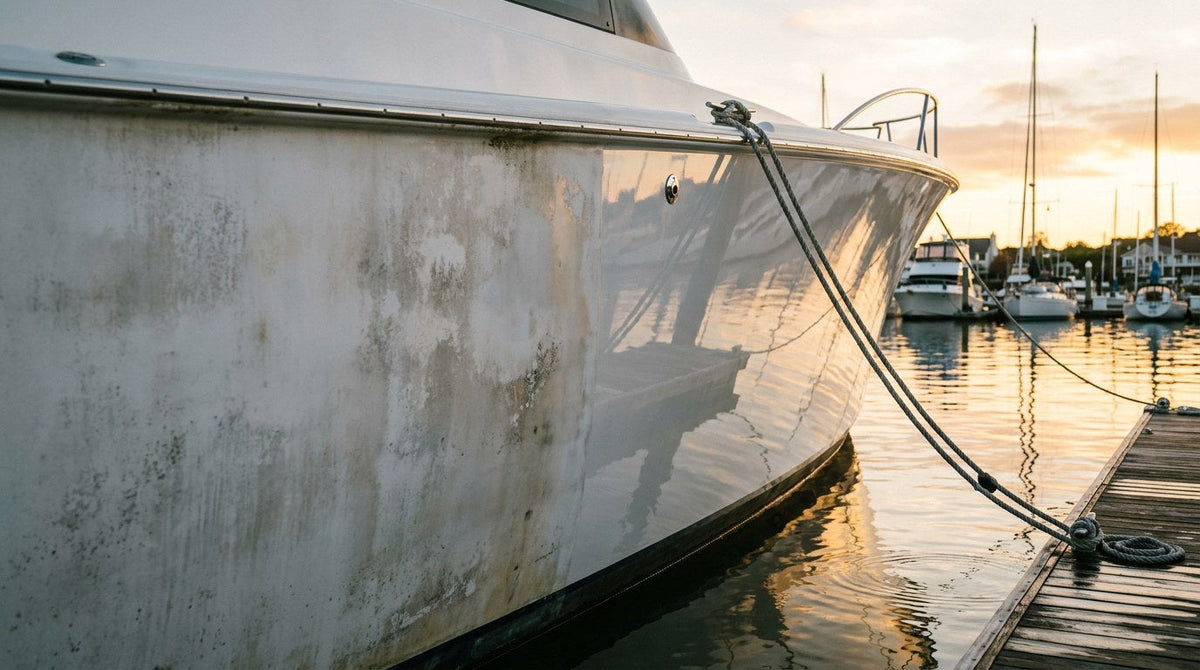
Polishing a fiberglass boat means removing the oxidized top layer of the gel coat with a compound, refining the finish with a polish, and sealing the fresh surface so it doesn't chalk out again in a season. The hull isn't painted — the color and gloss you see is the outermost layer of the mold-cast polyester-resin gel coat, and once UV, salt, and rain damage it, you have to physically level and refinish that layer with abrasive product before any wax, sealant, or ceramic can hold onto anything. This guide walks through the exact pad-and-compound sequence for every oxidation level, what the "right" combination actually looks like for fiberglass instead of paint, and how to make the fix last more than one season.

Fiberglass Boat vs Paint: Why the Same Technique Doesn't Work
The single biggest mistake DIY boat owners make is treating the hull like a painted car. It isn't. On a car, you have primer, base color, and a clear coat that averages roughly 40–60 microns thick — a hard, thin film you can only cut into so many times before you're through the clear. A fiberglass boat hull is different. The colored surface is the outermost 15–25 mil (about 380–635 microns) layer of gel coat that was sprayed into the mold first (industry standard, per the EPA Control Techniques Guidelines for Fiberglass Boat Manufacturing), then backed by resin-saturated fiberglass cloth. Most production hulls use isophthalic or orthophthalic polyester for the general laminate and higher-grade isophthalic or vinyl-ester gel coats on the outer surface for better water and UV resistance, as documented in standard marine fiberglass construction references.
What that means in practice:
- You can be much more aggressive with a compound and pad on gel coat than you can on paint — the layer is 10–15× thicker.
- Gel coat oxidizes uniformly and heavily under UV; car clear coat tends to fail in isolated failure points. Your correction pattern is different.
- Gel coat is porous relative to modern clear coat. It absorbs stains, chalks white as the resin degrades, and needs a stronger topical sealer to stay looking wet.
- Wet-sanding fiberglass to remove heavy oxidation is normal maintenance, not damage. Wet-sanding paint is a specialist job that eats clear coat you can't get back.
Once you internalize that gel coat is a thick, replaceable-through-cutting surface — not a fragile paint clear coat — every step below makes more sense.
Diagnose Oxidation Before You Touch a Compound

Pick the wrong starting product and you'll either waste a weekend making no visible progress or burn through good gel coat trying to fix damage that would have polished out with a light one-step. Use this five-tier read on the hull before you buy anything:
| Oxidation Level | What You See / Feel | Starting Product | Starting Pad |
|---|---|---|---|
| Level 1 — Dulled | Slight haze, hull feels smooth, no chalk on your hand | Fine polish | Soft foam finishing |
| Level 2 — Light chalking | Faint white residue transfers to a clean rag | Medium-cut polish | Medium foam |
| Level 3 — Moderate oxidation | Obvious white bloom, chalk transfers easily, faded color | Medium-heavy compound → polish | Wool cut → foam polish |
| Level 4 — Heavy chalking | Thick white bloom, color is unreadable, chalk visibly comes off dry | Heavy-cut compound → polish → finish | Aggressive wool → medium foam → soft foam |
| Level 5 — Severe / pitted | Micro-pitting, texture you can feel, dead-white regardless of rinse | Wet sand 1000/1500/2000 → heavy compound → polish → finish | Sanding block → wool → foam ladder |
The chalk-transfer test is the fastest read: wipe a clean white microfiber across a dry section of the hull. Zero transfer = Level 1. Faint white smudge = Level 2. Obvious white deposit on the rag = Level 3+. If the hull texture snags the rag or has a sandpaper feel, you're at Level 5 and machine polishing alone won't cut it — wet sanding is on the menu.
The Tools That Actually Matter for Fiberglass
You need less than the aftermarket wants to sell you. For 90% of hulls, five things do the work:
- A rotary or dual-action polisher — rotary spins faster and cuts harder (the right tool for Levels 3–5), dual-action is more forgiving and finishes cleaner (great for Levels 1–2 and the final refinement pass). If you only own one, a variable-speed rotary is what a full-time marine detailer would pick for gel coat.
- Wool cutting pads for oxidation removal at Levels 3–5. Wool tolerates the heat and pad-loading gel coat creates far better than foam does.
- Medium and soft foam pads for the polish and finish passes.
- Compound + polish + finishing polish — three products cover every hull. Skipping the polish step and going straight from compound to wax leaves microscopic haze that eats gloss.
- A pad-cleaning brush and a spray bottle of water to prime the pad and prevent compound from drying on your work face. A caked pad turns from cutting tool into a hologram machine.
For a step-by-step breakdown of how to run the machine itself — arm speed, overlap, and pressure — see our guide on how to use a buffer on a boat. This post assumes you have that mechanic down.
The Full Fiberglass Polish Sequence, Step by Step

Step 1: Wash the Hull Properly
Compounding a dirty hull grinds sand and salt crystals into the gel coat, which is how you introduce swirl marks and micro-scratches that then need heavier correction to fix. Rinse thoroughly, wash top-down with a boat-safe pH-neutral soap and two clean mitts (one for above the waterline, one for below), then rinse again. Dry with a large plush microfiber or forced air. Anything left on the surface — waterline scum, black streaks, pollen — should be spot-treated before you polish, not smeared into the compound layer.
Step 2: Mask, Tape, and Break the Hull Into Panels
Painter's tape saves gel coat from rotary edges. Tape off rub rails, decals you want to preserve, waterline stripes, transom letters, and anything with rubber or plastic trim. Then mentally break the hull into 2×2 ft working panels. If you try to work in wider zones, compound flashes before you can refine it, and the pad drags dried product across neighboring sections. Small panels, worked to completion, then move on.
Step 3: Prime the Pad and Apply Compound Sparingly
Mist the wool or foam pad with clean water until it's evenly damp — not soaked. This is called "priming" and it stops the first few minutes of dry pad from burning gel coat. Put four small dime-sized dots of compound around the pad, not one giant puddle in the center. More product doesn't cut faster; it just slings off and makes a mess.
Step 4: Spread, Then Work
With the machine off, dab the compound-loaded pad onto your working panel to spread it. Turn the polisher on at low speed (1000–1200 RPM on a rotary, speed 3–4 on a dual-action) to distribute product across the entire section. Then step up to your working speed — 1500–1800 RPM rotary, speed 5–6 dual-action — and work the section with slow, overlapping passes, arm speed roughly one inch per second, keeping the pad flat with light-to-moderate pressure. Do four to six passes: two horizontal, two vertical, then two diagonal.
Step 5: Wipe, Inspect, Decide
Wipe the section clean with a fresh microfiber. Look at it under natural light and under a bright LED at a raking angle. If the gel coat is now hazy but the chalk is gone, you're ready for polish. If chalk still transfers, hit it again with the compound. If the color is back but you see machine holograms or fine buffer trails, you're ready for polish. Don't move on until the compound step actually removed the oxidation you diagnosed — polish will not fix what compound didn't finish.
Step 6: Polish the Refined Surface
Swap to a clean medium foam pad and switch to a fine polish. Same priming, same four dots, same slow overlapping passes. This step's job is to refine the microscopic scratches your compound cut into the gel coat while it was removing oxidation. Skip it and the finish will look bright but slightly foggy in direct sun — you'll never get that "wet" pop without it.
Step 7: Finish for Show
Only necessary if the hull is going to be photographed, shown, or you're a perfectionist. Swap to a soft finishing foam and a jeweling polish. Two light passes. This is where the surface goes from "restored" to "reflective enough to see individual clouds move across it." For most working fishing boats, you can skip Step 7. For a wake boat, cabin cruiser, or anything with a topside color darker than white, do it — it doubles the visual depth.
Step 8: Wipe Down and IPA Panel
Before you seal anything, wipe every panel with a 15–25% isopropyl alcohol solution. This strips residual polish oils that a manufacturer might have blended in to mask minor swirls. You want to see the actual condition of the corrected gel coat, not a temporary chemical bloom. If oxidation looks like it's returning immediately after the IPA wipe, you didn't cut deep enough on the compound step — go back to Step 3 for that panel.
Step 9: Protect Immediately — Don't Wait
Freshly polished gel coat is chemically hungry. It's a raw, porous surface that will re-oxidize faster than you'd believe if you leave it uncoated even for a week. Seal the same day you polish. This is where the choice of protection determines whether you're doing this again in six months or measuring durability in years.
Compound vs Polish vs Finish: What Each Step Is Actually Doing
| Product | Abrasive Cut Size | Job | Pad |
|---|---|---|---|
| Heavy-cut compound | Large abrasives, high cut | Level oxidized gel coat by removing surface material | Wool |
| Medium polish | Medium abrasives, breaks down as it works | Remove compound haze, add clarity | Medium foam |
| Finishing / jeweling polish | Ultra-fine abrasives | Maximize gloss, refine reflection | Soft foam |
| Coating / sealant | None (chemical only) | Seal porous gel coat, add UV protection, hydrophobicity | Applicator |
Skipping any step doesn't just leave gloss on the table — it shortens the life of what you did. Compound alone leaves a micro-etched surface that oxidizes fast. Compound plus polish without a coating leaves porous gel coat exposed to UV and salt. The full sequence is what makes the fix stick.
When Wet Sanding Enters the Picture
If the chalk-transfer test still shows heavy white residue after two passes with a heavy compound and wool pad, or if the surface feels textured under a dragged fingernail, you're at Level 5 and you need to wet sand. This isn't a repair — it's normal fiberglass maintenance. Wet sanding removes a thin layer of dead gel coat that has become so degraded it can't be polished back.
The sequence is 1000 → 1500 → 2000 grit using a soft foam sanding block and plenty of clean water with a drop of soap for lubrication. Sand in overlapping straight passes, changing direction with each grit. After 2000, the hull will look uniformly matte and slightly cloudy — that's the correct starting point for heavy-cut compound, which will bring it back to gloss. Some severe hulls need to start at 800 grit, but you should never wet sand a hull without first understanding that the amount of gel coat you're removing is measured in single-digit mils.
Sealing the Result: Wax, Sealant, or Ceramic
You just spent a weekend removing 6–15 microns of oxidized gel coat. The choice of what goes on top determines how much of that work you'll have to repeat next year.
Marine wax — natural carnauba-based waxes look great the day you apply them and can be reapplied every 60–90 days. Cheap to buy, expensive in labor over a season because you're doing it four times.
Polymer sealant — synthetic sealants typically last 3–6 months on a well-prepped hull. Better UV protection than wax, similar water beading, easier application. Still a per-season commitment.
Ceramic coating — a crosslinked resin matrix that chemically bonds to the gel coat surface. The high-solids formulation cures into a durable, hydrophobic layer that resists UV degradation, chemical attack, and mineral deposits. Multi-year protection on gel coat when the surface is properly prepped (which you just did) and the coating is properly applied and allowed to cure.
For fiberglass hulls, we recommend HCC Hybrid Ceramic Coating as the default. It's the all-surface flagship — one bottle that works on cars, boats, planes, and bicycles — with a tunable flash and wipe window that forgives the temperature and humidity swings you deal with dockside. It uses the same high-solids, crosslinked hybrid resin matrix as our specialty coatings, delivering years of gel coat protection when applied on a properly polished surface. Think of it like engine mileage: some hulls with hard use in salt and constant sun get one range of life out of a coating, and hulls with covered storage and freshwater use get significantly more — the coating chemistry supports both, driven by how much abuse you subject it to.
If you're already deep into a marine-only program and want the dedicated marine formulation, Undrdog Marine and Marine Plus are formulated specifically for gel coat and aluminum. The choice between HCC and Marine comes down to whether you also want to coat trailers, tow vehicles, and household items with the same bottle (HCC), or want a boat-only product optimized for one job (Marine / Marine Plus). Both live on top of a polished hull the same way, and both need the surface prep this article just walked through.
Common Mistakes That Kill Fiberglass Polish Results
- Starting too aggressive. Reaching for a heavy compound and wool pad on a Level 1–2 hull removes gel coat you didn't need to lose. Always start with the least aggressive product that will do the job — you can escalate, you can't un-cut.
- Working panels too large. Compound flashes and dries. A dry pad on gel coat is a hologram factory. Two-by-two-foot sections, worked start to finish, then move.
- Reusing dirty pads. A pad loaded with removed oxidation and dried compound is doing damage, not correction. Have three or four pads per grade and rotate them out.
- Skipping the IPA wipe. Polish oils temporarily hide swirl marks. If you coat over them, the coating fails to adhere and the swirls reappear when the oil dissipates.
- Coating too soon. Give the surface the temperature and humidity window the coating instructions specify. Rushing this step is the single most common reason for coating failure on marine surfaces.
- Waxing over polish and calling it done. Wax on a polished hull looks great for exactly one month, then you're doing it all over again. The point of polishing is to prep for a real protective layer, not to make wax slightly shinier.
How Long the Result Lasts
A properly polished and ceramic-coated fiberglass hull holds a strong gloss and effective UV protection for years, not months. The variables that shift where in that range you land:
- Storage. Covered slip, dry-stack, or trailered under a cover — years toward the higher end. Uncovered open-water mooring in tropical UV — closer to the shorter end.
- Water type. Saltwater exposure with poor rinse discipline eats coatings faster than freshwater. Rinse after every trip.
- Wash discipline. A coating maintained with pH-neutral boat soap and periodic decontamination lasts far longer than one that gets scrubbed with dish soap and abrasive brushes.
- Reapplication of top layer. A ceramic base coat under a lightweight refreshing spray (applied every few months) extends the visible gloss significantly.
For the routine that keeps a ceramic coating on marine gel coat performing at its best across a full season, see our guide to protecting a boat hull from saltwater oxidation. And if you're deciding between coating options in 2026, our breakdown of boat wax vs ceramic coating vs polymer sealant walks through the durability, cost, and application trade-offs directly.
What If the Gel Coat Is Beyond Polishing?
Some hulls are too far gone. Signs you're past the point where polishing alone will restore the finish:
- Spider-web crazing (fine cracks in the gel coat) that reappears after every polish
- Gel coat thickness measurements below industry-standard safe values when checked with a gauge
- Discoloration in isolated patches that don't respond to any compound
- Blisters or bubbles under the gel coat surface (see below)
Blistering is a separate issue — it's water intrusion into the laminate below the gel coat, and per the WEST SYSTEM Fiberglass Boat Repair Manual, it's a resin-hydrolysis and osmosis problem rather than a surface finish problem. Polishing won't fix blisters; a professional gel coat repair or full re-gel-coating is the correct path.
For everything short of those failures, polishing plus a real ceramic coating will bring the hull back to a finish that outperforms what it looked like when it left the factory.
Frequently Asked Questions
Can I polish a fiberglass boat by hand?
Small sections — yes. A full hull — practically no. Hand polishing generates far less heat and pressure than a machine, so it can't remove moderate or heavy oxidation in any reasonable time. For a Level 1 hull with light dulling, hand polish and a soft applicator pad work fine. For anything at Level 2 or above, a machine polisher will do in one hour what would take you an unreasonable weekend by hand.
What grit should I start wet sanding at?
1000 grit for standard heavy oxidation, 1500 or 2000 grit if the surface still has some visible gloss but chalk transfer is heavy. Never start below 800 grit unless you're addressing a specific defect a marine repair shop has approved. Follow with the next two grits in sequence — 1000 → 1500 → 2000 — before moving to heavy compound. Skipping grits leaves scratches the heavy compound can't remove.
Rotary or dual-action for fiberglass?
Rotary for Levels 3–5 correction work — the higher heat and consistent rotational speed cut oxidation efficiently. Dual-action for Levels 1–2 correction and for the final refining pass on any hull. Full-time marine detailers commonly use both: rotary with wool for the cut, dual-action with foam for the finish. If you own one polisher, a variable-speed rotary will do more of the work needed on fiberglass than a DA will.
Do I have to wet sand oxidized gel coat?
Only if the surface is at Level 5 — micro-pitted, textured, still chalky after two heavy compound passes. For Levels 1–4, machine compounding with the right wool pad removes the oxidation without any sanding. Wet sanding removes more gel coat than compounding does, so you use it as a targeted tool for severe hulls, not a first step.
How thick is a typical fiberglass gel coat?
15–25 mil (roughly 380–635 microns) when new. Every polish removes single-digit microns of the top layer. A well-cared-for hull can be compounded and polished many times over its lifetime before the gel coat is thin enough to require professional attention.
What's the difference between marine polish and marine compound?
Cut size. Marine compound has larger, more aggressive abrasives designed to level oxidized gel coat quickly. Marine polish has smaller abrasives that refine the surface after compounding, removing haze and adding gloss. Some products are labeled "compound-polish" or "one-step" and blend the two — those work well for Level 1–2 hulls but can't do the correction on Level 3+ oxidation.
Can I use car polish on a fiberglass boat?
Car polish can work on Level 1–2 fiberglass, since the abrasive chemistry is similar, but purpose-built marine compounds and polishes are formulated for the thicker cut and heavier oxidation gel coat typically presents. See our dedicated breakdown on can you use car polish on a boat for the specific trade-offs and which car products actually crossover.
How often should I polish a fiberglass boat?
Full compound-and-polish sequence: once every 2–3 years if the hull is ceramic-coated and maintained; annually if it's under wax or sealant; more frequently if the hull lives in tropical UV with no cover. A quick polish (finishing polish only, no compound) can happen more often to refresh gloss without removing gel coat.
Does polishing damage the gel coat?
Compounding removes a thin layer of gel coat — that's the mechanism by which it works. Done correctly, over the life of the hull, you'll remove less gel coat than the original coat is thick. Done incorrectly (aggressive products used repeatedly on a hull that only needed light correction), you can measurably thin the gel coat. The rule: use the least aggressive combination that solves the actual condition of the hull.
Should I polish before or after coating?
Always before. Coating is the seal, not the fix. If you coat over oxidized or dull gel coat, you lock the dullness in and the coating fails prematurely because it bonded to a compromised surface. Compound → polish → optional finish → IPA wipe → coat. In that order.
The Bottom Line
Polishing a fiberglass boat isn't a mystical skill or an expensive service you can't do yourself. It's a mechanical process: diagnose the oxidation level honestly, match the pad and compound to the actual condition, work small panels to completion, refine with polish, wipe with IPA, then seal the fresh gel coat immediately with a real protective coating. Skip any of those steps and the work doesn't last. Do all of them and the hull looks better than the day you bought it — and it stays that way through seasons that would destroy a waxed boat.
Ready to seal what you just restored? HCC Hybrid Ceramic Coating is the flagship option for fiberglass hulls, cars, planes, and everything else you own. If you want a dedicated marine bottle, Undrdog Marine and Marine Plus are formulated specifically for gel coat and marine metals.

Leave a comment
This site is protected by hCaptcha and the hCaptcha Privacy Policy and Terms of Service apply.